| Welcome to Keyes' Corner! Pull up a chair, grab that mug of coffee, and settle in - this is the place to come if you're looking for the down-deep-and-dirty of the Halo engine. We get under the hood, and don't just bring you stunts - we show you everything you need to know to repeat them, and we take an in-depth look at where they might be useful.
Our first installment covers a glitch discovered by brad, back in late March 2002. The lowdown: for memory management purposes, the Halo team has broken each map up into 'loading zones' - the map's geometry loads, all at once, onto the Xbox's hard drive when you start a level, and then smaller chunks of it are loaded into RAM as needed. In order to keep from having to load more than one zone at a time into memory (the xbox can't actually DO that - it doesn't have enough RAM), if two players are in coop mode, and one crosses out of a zone, the other will be automagically teleported to his side. brad discovered a location on Assault on the Control Room where, in the process of this teleportation, Halo somehow loses its ability to decrease the number of clips carried by the teleporting character (or, in case of plasma weapons, the charge on the gun). It still keeps count of your bullets... but once you finish a clip, it doesn't decrement your total clip count. In English - this means you have essentially unlimited ammunition. This discovery sent Stormsinger on a research frenzy - he wanted to know EXACTLY what the extent of this glitch was. The article you're reading now is a result of that research.
There are restrictions on the glitch, of course:
- You can't take it with you from one level to the next.
- You lose it if you die.
- You cannot activate the glitch if you're inside a vehicle. (This applies to the teleporting player only.) If you've activated the glitch (i.e., you HAVE UA or UC), and you get in a vehicle - any seat - you'll lose it.
- You can change weapons - ONCE. Change back, or pick up a new weapon... it's gone. (Nothing stops you from re-triggering it, however.)
- If you trigger the glitch with less than a full clip, you will need multiple reloads to get to a full clip. For example: If you are holding an Assault Rifle with 25 shots left in the clip, upon triggering the glitch, when you empty a clip, you'll reload once, to 25 shots, then again, to 50 shots, then again, to 60 shots. This can be a problem in heavy firefights, so plan accordingly.
- There are very specific locations in which this glitch works. Not every loading zone can trigger it, and even amongst those that do, not all of them work the same way. Currently, there are 11 loading zone boundaries on six levels that we know of across which this glitch can be triggered.
Soon after the discovery of the Unlimited Ammo glitch, Stormsinger discovered that it worked for invisibility, as well - and a permanently invisible player did some weird things to the Halo AI. However, we're getting ahead of ourselves. Let's look at the overall picture:
- Available on 6 of 10 levels
- Was once thought to require careful timing of reloading to trigger - unnecessary (simply teleporting across the loading zone triggers the glitch)
- Works with ammo and camo (since invisibility requires that an active camo powerup is within the zone, this is available in fewer areas)
- Works only in Coop mode (requires one player to pull the other across a loading zone)
- Not all zones stick on the first crossing - it's safer to cross forwards, then backwards, just to be sure
- Manually reloading does not affect glitch
- Swapping weapons - ONCE - does not affect glitch
- Glitch does not carry over from one level to the next, or through a death
- Added 7/29/02: Unlimited ammo for your second weapon is not affected by your entering a vehicle... as long as you haven't switched to the second weapon first. That is: If you trigger the glitch, you're awarded unlimited ammo on both your first and second weapons. If you enter a vehicle after this point, you lose UA for that first (in-hand) weapon... but you STILL have it for the backup weapon. In fact, you can get in and out of as many vehicles as you like, and in fact swap your primary weapon for other weapons... and you will not affect the unlimited ammo status of your second weapon, as long as you haven't actually switched to it. Smart players can use this tidbit to great advantage, with a bit of care... thanks to Storm Singer for sussing this out!
Before jumping in to the glitch itself, the various people who made this possible should be thanked.
- The trick was originally discovered by brad, back in late March.
- Stormsinger worked out the vast majority of the details (which loading zones beyond that first one work, what needs to be done to trigger the glitch, and the fact that Invisibility is covered by the glitch as well).
- The maps you'll find on these pages were created by Stormsinger, as well.
- The movies, showing the glitch in action in all 11 affected loading zones, were created by xbill, Frogblast, and Louis Wu.
- Finally, the nice little banner for this new section was created by Stormsinger, with a little help from Louis Wu.
Pillar of Autumn |
| There are two loading zones from which unlimited ammo can be accessed on this level. Both are inside the maintenance tunnels. |
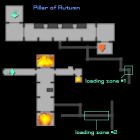 |
The map thumb will lead you to more complete directions.
|
|
Silent Cartographer |
| There is just a single UA loading zone on this level. |
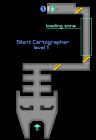 |
Follow the thumb for a closeup and movie links.
|
|
Assault on the Control Room |
| Again, there is just a single UA loading zone on this level. |
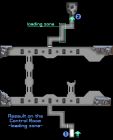 |
This is where it all began.
|
|
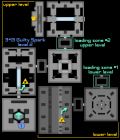
343 Guilty Spark |
| This is the most confusing level to find loading zones on - because of its stacked nature, and because of its lack of easily identifiable landmarks. Hopefully the maps and the movies will guide you in the proper direction. |
 |
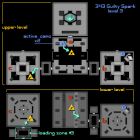 |
There are three loading zones on this level - check the maps.
|
|
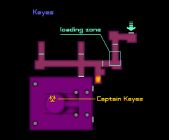
Keyes |
| You run across the loading zone immediately before one of the larger firefights of the level - nice timing! |
|
|
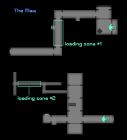
The Maw |
| There are actually 3 zones on this level, but the map below shows only two of them. The third, located in the final run itself, can be located via your nav beacon (see the sub-page for details). |
|
|
|
| Top of Page |
|