 |


About This Site
Daily Musings
News
News Archive
Site Resources
Concept Art
Halo Bulletins
Interviews
Movies
Music
Miscellaneous
Mailbag
HBO PAL
Game Fun
The Halo Story
Tips and Tricks
Fan Creations
Wallpaper
Misc. Art
Fan Fiction
Comics
Logos
Banners
Press Coverage
Halo Reviews
Halo 2 Previews
Press Scans
Community
HBO Forum
Clan HBO Forum
ARG Forum
Links
Admin
Submissions
Uploads
Contact
|
 |
 |
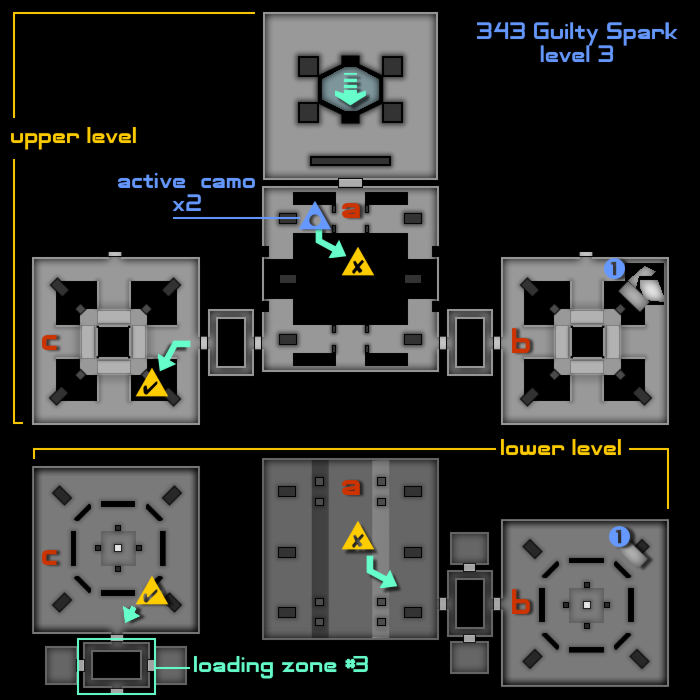
343 Guilty Spark Level 3 |

|
|
After the movie with Jenkins, you work your way to a second lift that takes you further down. This is the large green arrow at the top of the map. From here, the door takes you directly to an area with a pair of active camouflage powerups, in the room marked 'a'. The route from here to Loading Zone #3 is somewhat circuitous: follow the triangular 'X' route, drop down to the lower part of room 'a'. Head out towards 'b', and climb back up to the top level, at the blue '1'. Run straight across to 'c', and drop down to the lower level (and the gateway to the loading zone). Given that you can only exploit this glitch in coop mode, you can also try using the second marine as a step, to get back into the upper part of 'a', and circumvent 'b' altogether. (The easiest course of action - to simply return to one of the previous zones - is unfortunately not available; that elevator is one-way only.) Watch the movie for Zone #3
|
| main |
|


