|
Spawns and You: Re-read this in 5, 4, 3...An OverviewWhile there have been a few writeups on the Halo 3 spawning system, I feel they only went halfway with the facts and just assumed the rest. Everything in this writeup has been observed and tested over and over again with my "spawn lab" of sorts, high in the sky of Sandbox. While this is tested with and applies to Halo 3, many of these concepts might be applicable to Reach. What follows is both a dissection and guide on the spawn system and how you should be using it to it's best potential. Spawnlab: DSB
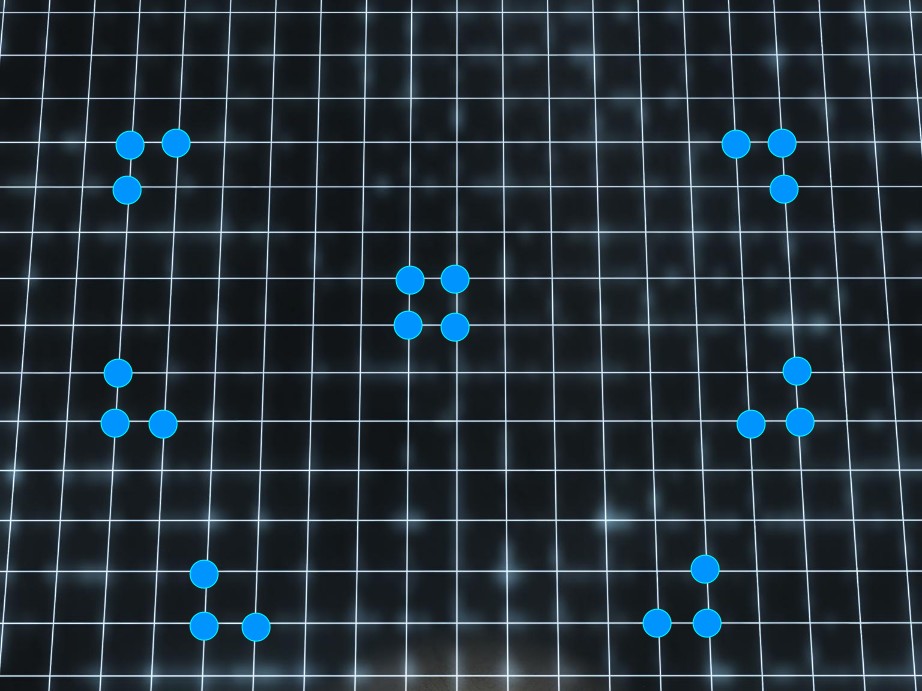
In order to test more situations involving spawns easily, I used this map to create test layouts in the Sky Bubble of Sandbox. There are no spawns except the ones I place up here, so it is safe from being influenced by latency (for Live tests) and allows me to block all the Emergency spawns on the bottom of the map. Fusion coils are used to mark spawns so that it is easier to measure areas of effect and distance when not in the Forge game mode. Multiple configurations of this map were made to test all possible situations and map configurations. The configuration pictured above named "Linear" is just one of many. Spawn Points1) Types of spawns:
Obstructions and Line of SightSpawns ignore geometry, line of sight, and weapons fire over them. Think of spawns as a 3D cloud of points (x,y,z). Think of the players as a sphere centered around their x,y,z point. This sphere moves around with the player and intersects with spawns. For example, it's possible to stand on the other side of a wall and buddy spawn people onto a spawn that's on the opposite side of the wall from you. Line-Of-Sight blocking would be extremely computationally expensive for multiplayer (you'd have to cast LOS rays from 16 players) and would be too easy to just stareblock and spawncamp. After staring at a spawn for a good line time with an open spot behind me that was just as 'available', them player was never blocked from spawning on it. All spawn points have a base 'value' of 1000. The value that players and objectives add or subtract can only be guessed at, however. We do not have access to any debug information in films. Spawn Areas1) Types of spawn areas:
Certain objectives also act as spawn areas:
In Team Slayer, a host migration will usually cause the spawn zones to "flip" between teams. Keep this in mind for your slayer setups; it's usually a good idea to make each base as equal as possible for Slayer. This does not happen in objective modes, so if you want a slayer map with 'offense' and 'defense' bases that you can count on being properly spawned in, use the VIP gametype. Spawn Zones will only enforce spawns within them for objective gametypes. The only way un-zoned spawns can be used in a objective team game is if there are more than two teams, or a rare situation of the spawns being completely unusable. Using a "neutral" spawn zone is more for FFA; the Attacker/Defender spawns will be considered first in team games, while FFA will only use the Neutral spawn zone. This lets you do stuff like have teams spawn on the outside of a map - and then have people stay clumped near the center in FFA. Contrary to popular belief, you CANNOT add weight or reduce the weighting of spawns by stepping into a spawn zone. I know, I thought this myself in the earlier days of Halo 3. But after extensive testing, I have proven that standing in a spawn zone will not prevent enemies from spawning in it (when spawns outside that zone are available) and will not make teammates spawn in it. Spawn areas simply mark the spawns, and hence why Bungie mostly uses only one spawn area per team on their shipping maps. Spawn WeightingThings that weight a spawn towards you spawning in it:
Things that reduce a weight for a spawn:
A teammate near a spawn will cause other players to spawn there, which is also known as the 'buddy spawn' effect. The buddy spawn has a heavier weight than a spawn zone, so keep this in mind while designing a map - players can force their team to spawn outside a marked zone on neutral spawns! I have personally tested this out in Big Team Battle (Avalanche) by standing slightly behind the side mancannons when my team encountered a bad situation near the shotgun spawn. I induced a series of buddy spawning where each person spawned, moved forward, and the next dead teammate spawned shortly after in the same spot. In about 10 seconds, the entire 7 people that just died had all spawned at the mancannon and were able to simultaneously leap to the laser spawn to regain it. Spawn Values and Effector ValuesBase spawn value: 1000 (known from a Bungie Weekly Update). All guessed values have a * next to them - these are close approximations that SHOULD work when doing the math for a situation.
Important thing about player death weighting! You must consider the fact that right before a player died over a spawn, they added weight by being on the spawn. So the weight of a spawn is not the Base - Death, but Base + Respawn Area + Player, Ally - Player, Death. With no other factors, this means a spawn has a weight of 1000+300+500, or 1800. This is why you will usually die two times before being sent somewhere else - the first death will reduce the weight of the spawn to 1100. Since it's usually 5 seconds to respawn, the weight of the spawn will be back to 1300 by the time you are put back onto it. When you die again, the weight will become 600. By the time you respawn then, the weight will be 1100, which is less than all your other spawns at 1300, therefore sending you elsewhere. While you wait to respawn, no teammates should be sent to where you just died (unless all the other spawns are deweighted considerably) Examples
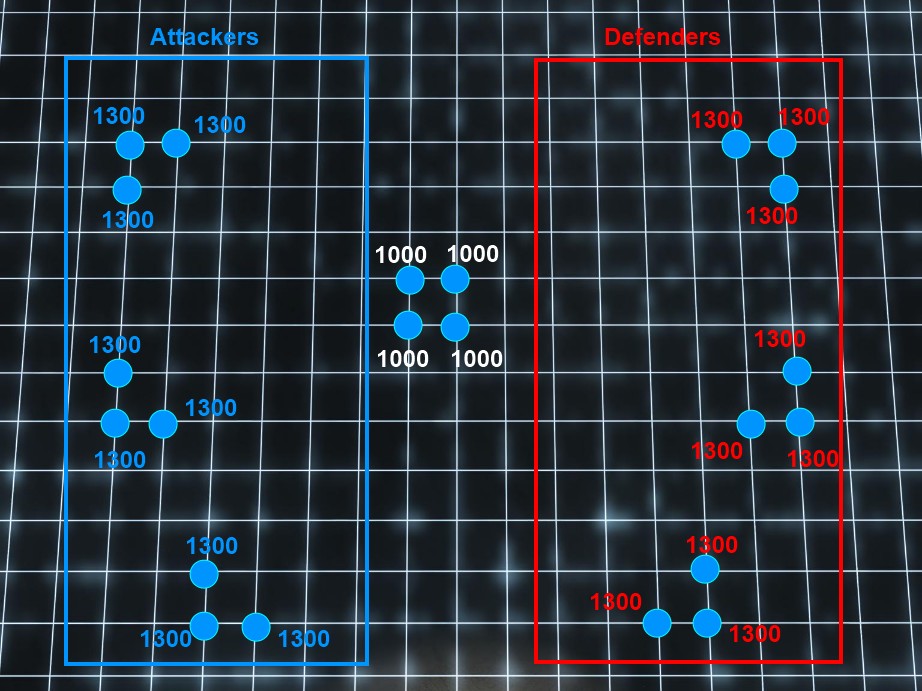
Here we have a neutral spawn setup. The actual layout of the map does not matter, because the engine doesn't care about any walls or objects laying between the spawns. Every spawn in this setup has a weight of 1000. If you were to start a game of Slayer on this map, the spawns would be completely random due to the lack of Starting Points. Whichever teammate spawned first would determine where everyone else started. Spawns would be determined by a combination of deaths, player positioning, and spawn blocking.
Now we've put some spawn zones over the spawns. The spawn zones add weight for a certain team in Team Slayer. Without a Starting Point present, every spawn in the zone is an equal candidate as a starting position. The unzoned spawns have a neutral weight of 1000, and will not be selected as a starting position for either team. Team Slayer is a special case in that the spawns in an opposing team's zone are still technically considered by the engine for spawning. The weighting numbers (color coded) are represented as such. If one team were to successfully block the opposing team spawns AND the neutral spawns, the engine will place them on spawns not zoned for them! This is why it's important to have plenty of spawn points and distance between said points.
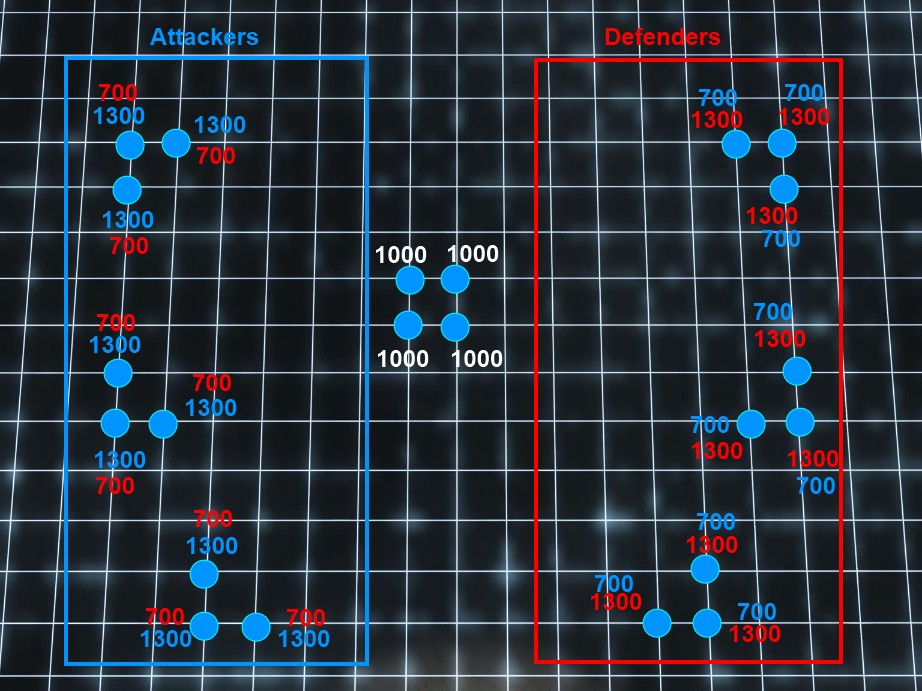
(It's also why spawn zones are not a good idea on small maps for Slayer - it makes spawn camping too easy, as it limits the engine's ability to put people in a safe place. Base defense is not a primary goal of Team Slayer, so there is no need to force people to spawn like they are. But I could write a whole other article on Spawn Camping and how it effects people's opinions of maps.) Now! Let's introduce two players into the field. Note how player positioning affects where the engine will choose to spawn. Please remember that the weights are an educated assumption; actual engine values may differ.
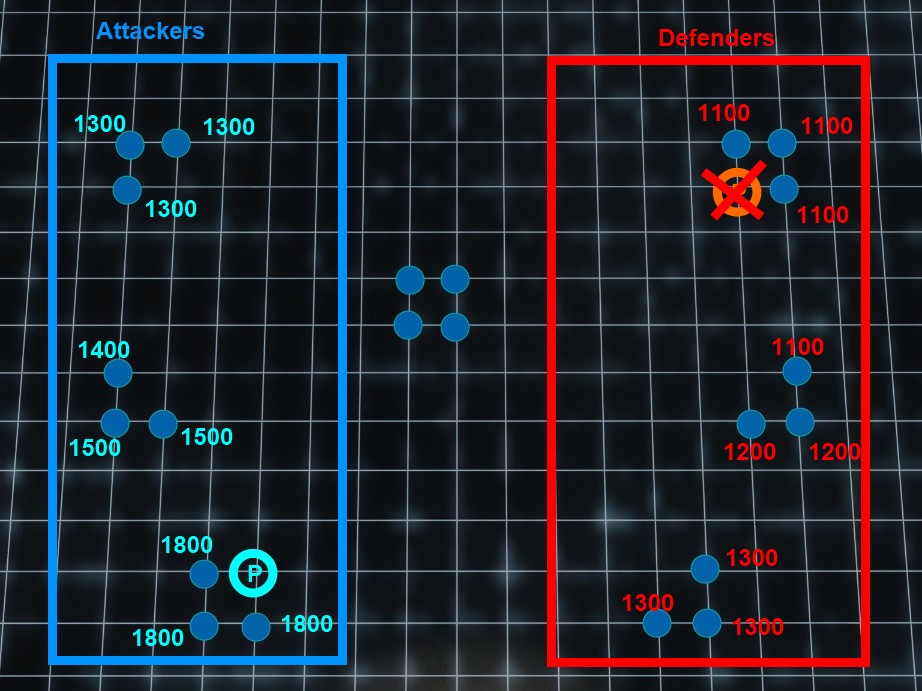
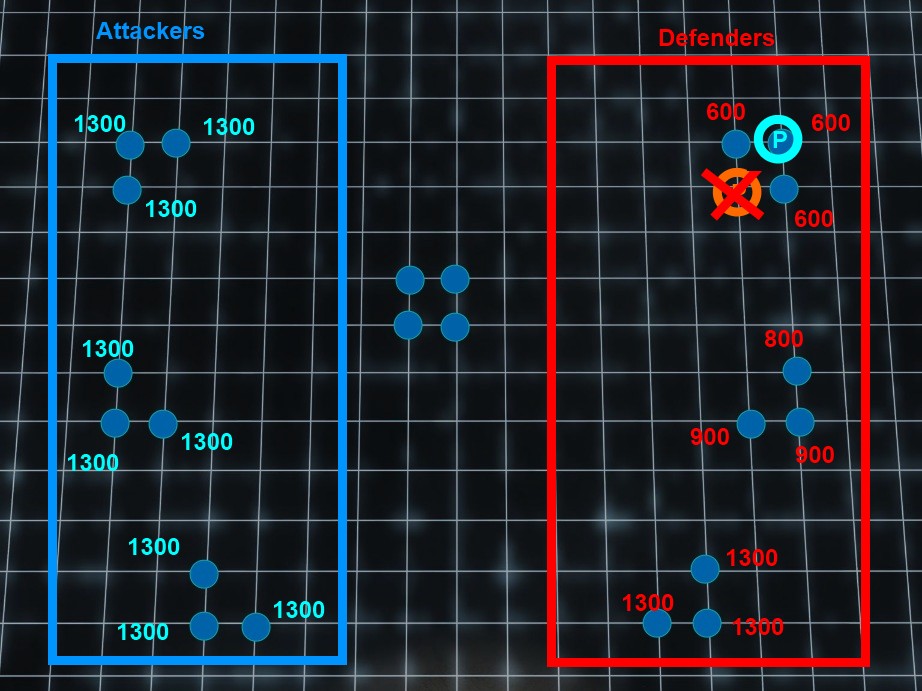
If the players continue to stand where they are, teammates will be spawned on the spawnpoints directly next to them if no other influences are around. If the player has just been put into the game at the same location via a Starting Point, his teammates are guaranteed to spawn at the points next to him. Now, let's assume that neither player has moved, and that the blue player has sniped the red player. The weight of the spawns around the death are roughly changed like so:
Remember that the player standing next to the spawns added weight right before he died, so we're subtracting weight from that. Not the base amount. This weighting is also only at the moment of death - by the time the player respawns, all the spawns in the zone will be equally weighted and he can potentially respawn right where he just died. This is reason number two why Spawn Zones hurt small maps and lends itself to spawn camping. A quick death as he respawns will definitely send him to the lower spawns. In another situation, the blue player has assassinated the red player while standing on one of their spawns.
The red player will definitely respawn at the lower spawns when he comes back. No multiple backsmacks for that jerk blue! These examples are stripped down to the basics to demonstrate the basic mechanics of weighting. In the real world, this map would be pretty bad spawn-wise. It has too few spawns for either team and would be way too campable. Spawn BlockingThings that prevent you from spawning on a spawn:
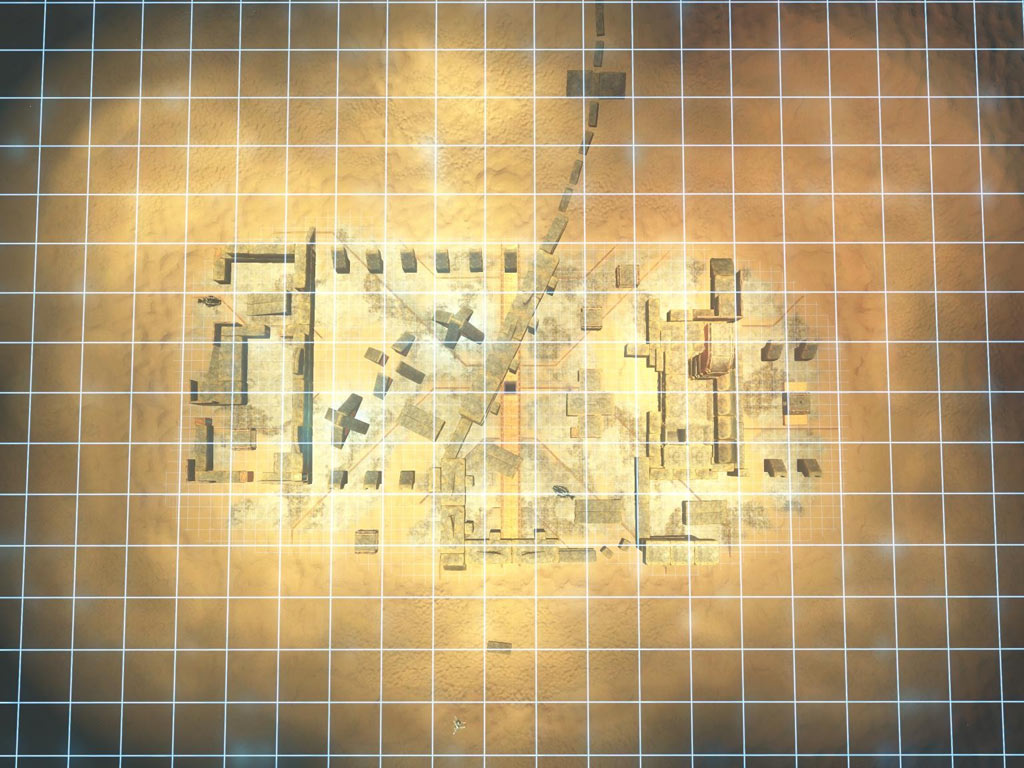
If all normal spawns are blocked, the game will go to the hard coded "emergency spawns" as backup. Emergency SpawnsFrom all my testing, Emergency Spawns do not influence the spawn system under normal conditions. The only time you can spawn at one is if all available spawns are blocked. If all emergency spawns are blocked, the player will be stuck at a black screen until they choose to quit the game. All maps in Halo 3 have these emergency spawns hardcoded into them. Engine And Gameplay ObservationsThe closer the spawns have to be next to each other, the harder the engine has issues with them. Blackout, for example. The spawns are so close that the engine has to keep "throwing the dice" because of the close proximity means that a billion things are increasing and decreasing weight spawns at the same time. Your sphere-of-influence was clearly designed for bigger Halo 3 maps and not Halo 2 remakes. This is why the Narrows without spawn zones is better, because Narrows with spawn zones is a campfest. On a smaller map, no-spawn-zones work because the teams spawn WITH each other, but not in 100% predictable locations. If you're getting massacred, stop running out by yourself and wait a moment for your teammates to spawn on you. Spawn zones make sense on bigger maps because they are big enough to let your team regroup and push back the opponent (and are too big for opponents to set up spawn blocks). Have I mentioned enough times now that putting spawn zones in small maps for Slayer is a bad idea? All getting spawncamped will do is make a player veto your map or quit a game, so you should go out of your way to make it hard to do. Remember the hard rule of map design - assume everyone that is going to play your map knows all the glitches and tricks and is a complete asshole to every person they meet. Do not assume people will be nice and not exploit your 5 spawns that are sitting out in the middle of a field. Spawn DistributionThe actual layout of your map's spawns must also be considered when placing them. Putting a lot of spawns in one area and little in another will create an imbalanced spawning setup or will result in a heavier spawn rate in an out-of-way portion of the map. Making people hoof it back to the battle is not fun if you could have put them safely closer! An easy way to determine your map's spawn weight by distribution is to simply fly above it in Forge. You can even use the skybubble as a lazy grid layout! For this example I am using my ATLAS submission "Platte":
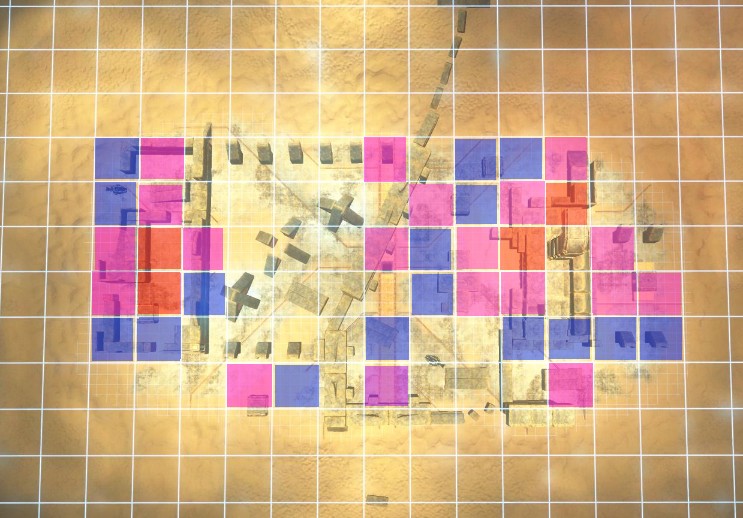
I simply went through the Forge-only teleporter so that the camera could get up into the skybubble. Now, start counting the spawns inside of each square. For this map, I am considering 2-3 spawns "medium/purple", 4+ spawns "heavy/red", and 1 spawn "light/blue". After counting the spawns in each square and color coding them, I get a nice overview like this:
Now it's very easy to tell where most of my players will start out! This helps determine problem areas and spawns much faster than pulling enough people together for a game and then watching the film. In earlier versions of this map, my spawns were safe and no spawn camping happened.. except I had too many spawns on the top side of the right base. This made it so the offense team on 1 Flag was always encouraged to head to the bottom exit, as most people would be spawning behind them and not in front of them. With some adjustments and testing, the final spawn distribution above was reached. Spawns were shifted downwards so that there was a roughly equal chance of spawning on either side of the Defense base. Spawns were shifted inside the Defense base to the left so that the Offense team would have a reason to use the teleporter. A couple of spawns were added to the "no man's land" in the middle of the map to facilitate FFA. The 'core' of each base's spawn is roughly in equal positions on the map. The final tweak was to remove all but two spawns from the top floor of the Defense base so that Offense were rewarded for pushing the defenders off the top. If your players are complaining that it takes too long to get into a fight or that it always seems a team is taking the flag or bomb in one direction, it may be time to look at your map's spawn distribution. Clever use of the combination of spawn zones and spawn distribution should result in use of most parts of your map for travel and objectives. Players can adapt to and figure out how your spawns work in as little as 3 games. Your map has to hold up to the other 997+ times they will play on it (if you made a good map) ! Symmetrical maps should look pretty much the same on both sides when using this technique. Spawn Placement Do and Don'ts
Number of Spawns Minimum For GametypesWhile maps will work with less, they won't work well, or may explode in your face. If you don't have enough spawns, many players will probably be looking at black screens or delayed spawns after the countdown finishes. Or even fun stuff like spawning on top of the opposing team's flag.
Foundry can generally handle up to 4v4 or 5v5 games comfortably. Sandbox can handle BTB comfortably on the ground level and in the sky. However, most maps you will make in the crypt will be better suited to a maximum of 5v5. And no matter what you do, 8v8 on Cold Storage will never be fun. End of story! (Unless you like assassinations) "But I saw this on Youtube"No, I don't care what you saw on BESTSNIPA1337's Youtube channel. You cannot:
Too Long, Didn't ReadDid you just scroll down to the bottom? Shame on you! You skipped over all the science that I put together to demonstrate good and bad spawn creation practices. However, you can follow my 7 Tenets of Spawn Placement easily!
Thanks and CreditsText written and ©2010 Michael 'FyreWulff' Kidder
Special thanks to Ratsult2, as I probably sniped him about 3,000 times while testing spawns. You may copy and re-use the text of this writeup in your own works as long as you credit the author and include a link to the original. |
|
|